
diff options
Diffstat (limited to 'examples/VirtualMatrixPanel')
| -rw-r--r-- | examples/VirtualMatrixPanel/README.md | 51 | ||||
| -rw-r--r-- | examples/VirtualMatrixPanel/VirtualMatrixPanel.ino | 169 |
2 files changed, 220 insertions, 0 deletions
diff --git a/examples/VirtualMatrixPanel/README.md b/examples/VirtualMatrixPanel/README.md new file mode 100644 index 0000000..c5aca88 --- /dev/null +++ b/examples/VirtualMatrixPanel/README.md @@ -0,0 +1,51 @@ +## Chained Panels example - Chaining individual LED matrix panels to make a larger panel ## + +This is the PatternPlasma Demo adopted for use with multiple LED Matrix Panel displays arranged in a non standard order (i.e. a grid) to make a bigger display. + + + +### What do we mean by 'non standard order'? ### + +When you link / chain multiple panels together, the ESP32-HUB75-MatrixPanel-I2S-DMA library treats as one wide horizontal panel. This would be a 'standard' (default) order. + +Non-standard order is essentially the creation of a non-horizontal-only display that you can draw to in the same way you would any other display, with VirtualDisplay library looking after the pixel mapping to the physical chained panels. + +For example: You bought four (4) 64x32px panels, and wanted to use them to create a 128x64pixel display. You would use the VirtualMatrixPanel class. + +[Refer to this document](https://github.com/mrfaptastic/ESP32-HUB75-MatrixPanel-DMA/blob/master/doc/VirtualMatrixPanel.pdf) for an explanation and refer to this example on how to use. + + +### Steps to Use ### + +1. [Refer to this document](https://github.com/mrfaptastic/ESP32-HUB75-MatrixPanel-DMA/blob/master/doc/VirtualMatrixPanel.pdf) for an explanation and refer to this example on how to use. + +2. In your Arduino sketch, configure these defines accordingly: +``` +#define PANEL_RES_X 64 // Number of pixels wide of each INDIVIDUAL panel module. +#define PANEL_RES_Y 32 // Number of pixels tall of each INDIVIDUAL panel module. + +#define NUM_ROWS 2 // Number of rows of chained INDIVIDUAL PANELS +#define NUM_COLS 2 // Number of INDIVIDUAL PANELS per ROW + +#define PANEL_CHAIN NUM_ROWS*NUM_COLS // total number of panels chained one to another + +#define VIRTUAL_MATRIX_CHAIN_TYPE <INSERT CHAINING TYPE HERE - Refer to documentation or example> + +``` +VIRTUAL_MATRIX_CHAIN_TYPE's: +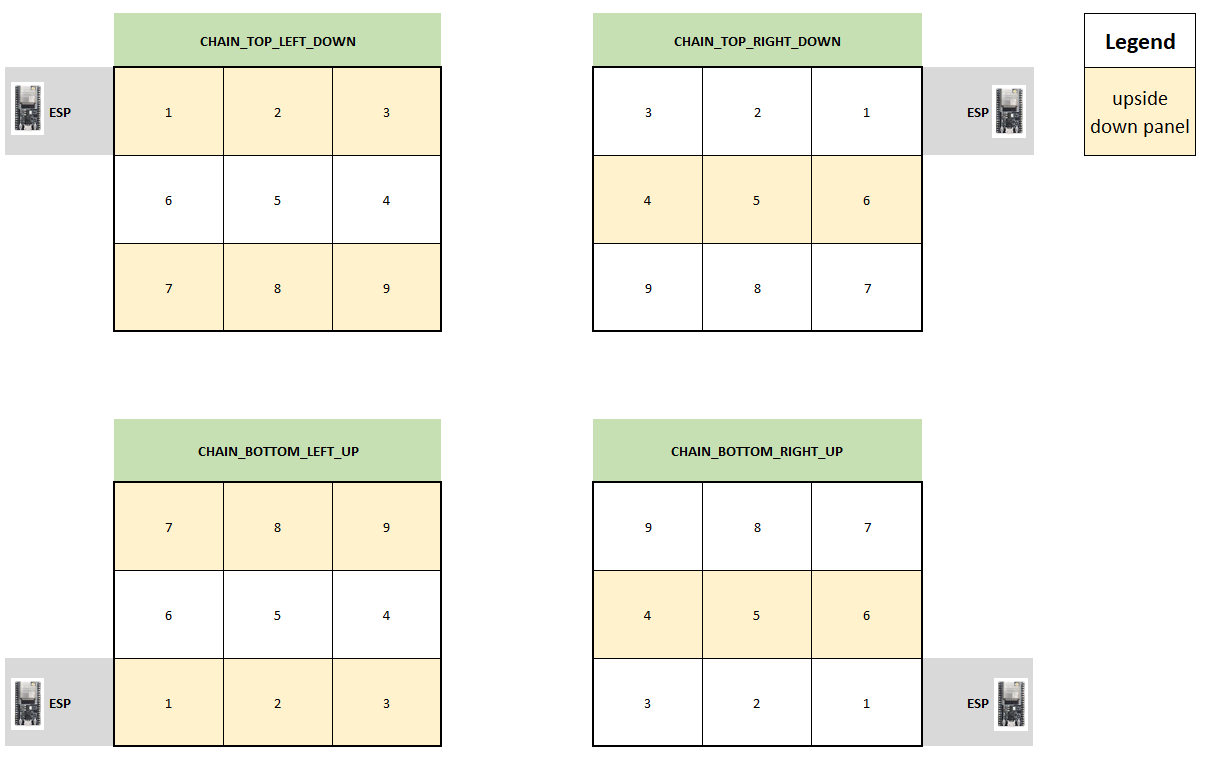 + + +3. In your Arduino sketch, use the 'VirtualMatrixPanel' class instance (virtualDisp) to draw to the display (i.e. drawPixel), instead of the underling MatrixPanel_I2S_DMA class instance (dma_display). + + +#### Thanks to #### +* Brian Lough for the Virtual to Real pixel co-ordinate code. + +YouTube: https://www.youtube.com/brianlough + +Tindie: https://www.tindie.com/stores/brianlough/ + +Twitter: https://twitter.com/witnessmenow + +* Galaxy-Man for the donation of hardware for testing. diff --git a/examples/VirtualMatrixPanel/VirtualMatrixPanel.ino b/examples/VirtualMatrixPanel/VirtualMatrixPanel.ino new file mode 100644 index 0000000..1343d9b --- /dev/null +++ b/examples/VirtualMatrixPanel/VirtualMatrixPanel.ino @@ -0,0 +1,169 @@ +/****************************************************************************** + ------------------------------------------------------------------------- + Steps to create a virtual display made up of a chain of panels in a grid + ------------------------------------------------------------------------- + + Read the documentation! + https://github.com/mrfaptastic/ESP32-HUB75-MatrixPanel-DMA/tree/master/examples/ChainedPanels + + tl/dr: + + - Set values for NUM_ROWS, NUM_COLS, PANEL_RES_X, PANEL_RES_Y, PANEL_CHAIN_TYPE. + + - Other than where the matrix is defined and matrix.begin in the setup, you + should now be using the virtual display for everything (drawing pixels, writing text etc). + You can do a find and replace of all calls if it's an existing sketch + (just make sure you don't replace the definition and the matrix.begin) + + - If the sketch makes use of MATRIX_HEIGHT or MATRIX_WIDTH, these will need to be + replaced with the width and height of your virtual screen. + Either make new defines and use that, or you can use virtualDisp.width() or .height() + +*****************************************************************************/ +// 1) Include key virtual display library + #include <ESP32-VirtualMatrixPanel-I2S-DMA.h> + +// 2) Set configuration + #define PANEL_RES_X 64 // Number of pixels wide of each INDIVIDUAL panel module. + #define PANEL_RES_Y 32 // Number of pixels tall of each INDIVIDUAL panel module. + + #define NUM_ROWS 2 // Number of rows of chained INDIVIDUAL PANELS + #define NUM_COLS 2 // Number of INDIVIDUAL PANELS per ROW + #define PANEL_CHAIN NUM_ROWS*NUM_COLS // total number of panels chained one to another + + /* Configure the serpetine chaining approach. Options are: + CHAIN_TOP_LEFT_DOWN + CHAIN_TOP_RIGHT_DOWN + CHAIN_BOTTOM_LEFT_UP + CHAIN_BOTTOM_RIGHT_UP + + The location (i.e. 'TOP_LEFT', 'BOTTOM_RIGHT') etc. refers to the starting point where + the ESP32 is located, and how the chain of panels will 'roll out' from there. + + In this example we're using 'CHAIN_BOTTOM_LEFT_UP' which would look like this in the real world: + + Chain of 4 x 64x32 panels with the ESP at the BOTTOM_LEFT: + + +---------+---------+ + | 4 | 3 | + | | | + +---------+---------+ + | 1 | 2 | + | (ESP) | | + +---------+---------+ + + */ + #define VIRTUAL_MATRIX_CHAIN_TYPE CHAIN_BOTTOM_LEFT_UP + +// 3) Create the runtime objects to use + + // placeholder for the matrix object + MatrixPanel_I2S_DMA *dma_display = nullptr; + + // placeholder for the virtual display object + VirtualMatrixPanel *virtualDisp = nullptr; + + +/****************************************************************************** + * Setup! + ******************************************************************************/ +void setup() { + + delay(2000); + Serial.begin(115200); + Serial.println(""); Serial.println(""); Serial.println(""); + Serial.println("*****************************************************"); + Serial.println(" HELLO !"); + Serial.println("*****************************************************"); + + + /****************************************************************************** + * Create physical DMA panel class AND virtual (chained) display class. + ******************************************************************************/ + + /* + The configuration for MatrixPanel_I2S_DMA object is held in HUB75_I2S_CFG structure, + All options has it's predefined default values. So we can create a new structure and redefine only the options we need + + Please refer to the '2_PatternPlasma.ino' example for detailed example of how to use the MatrixPanel_I2S_DMA configuration + */ + + HUB75_I2S_CFG mxconfig( + PANEL_RES_X, // module width + PANEL_RES_Y, // module height + PANEL_CHAIN // chain length + ); + + //mxconfig.driver = HUB75_I2S_CFG::FM6126A; // in case that we use panels based on FM6126A chip, we can set it here before creating MatrixPanel_I2S_DMA object + + // Sanity checks + if (NUM_ROWS <= 1) { + Serial.println(F("There is no reason to use the VirtualDisplay class for a single horizontal chain and row!")); + } + + // OK, now we can create our matrix object + dma_display = new MatrixPanel_I2S_DMA(mxconfig); + + // let's adjust default brightness to about 75% + dma_display->setBrightness8(192); // range is 0-255, 0 - 0%, 255 - 100% + + // Allocate memory and start DMA display + if( not dma_display->begin() ) + Serial.println("****** !KABOOM! I2S memory allocation failed ***********"); + + // create VirtualDisplay object based on our newly created dma_display object + virtualDisp = new VirtualMatrixPanel((*dma_display), NUM_ROWS, NUM_COLS, PANEL_RES_X, PANEL_RES_Y, VIRTUAL_MATRIX_CHAIN_TYPE); + + // So far so good, so continue + virtualDisp->fillScreen(virtualDisp->color444(0, 0, 0)); + virtualDisp->drawDisplayTest(); // draw text numbering on each screen to check connectivity + + // delay(1000); + + Serial.println("Chain of 4x 64x32 panels for this example:"); + Serial.println("+---------+---------+"); + Serial.println("| 4 | 3 |"); + Serial.println("| | |"); + Serial.println("+---------+---------+"); + Serial.println("| 1 | 2 |"); + Serial.println("| (ESP32) | |"); + Serial.println("+---------+---------+"); + + // draw blue text + virtualDisp->setFont(&FreeSansBold12pt7b); + virtualDisp->setTextColor(virtualDisp->color565(0, 0, 255)); + virtualDisp->setTextSize(3); + virtualDisp->setCursor(0, virtualDisp->height()- ((virtualDisp->height()-45)/2)); + virtualDisp->print("ABCD"); + + // Red text inside red rect (2 pix in from edge) + virtualDisp->drawRect(1,1, virtualDisp->width()-2, virtualDisp->height()-2, virtualDisp->color565(255,0,0)); + + // White line from top left to bottom right + virtualDisp->drawLine(0,0, virtualDisp->width()-1, virtualDisp->height()-1, virtualDisp->color565(255,255,255)); + + virtualDisp->drawDisplayTest(); // re draw text numbering on each screen to check connectivity + +} + +void loop() { + + +} // end loop + + +/***************************************************************************** + + Thanks to: + + * Brian Lough for the original example as raised in this issue: + https://github.com/mrfaptastic/ESP32-HUB75-MatrixPanel-I2S-DMA/issues/26 + + YouTube: https://www.youtube.com/brianlough + Tindie: https://www.tindie.com/stores/brianlough/ + Twitter: https://twitter.com/witnessmenow + + * Galaxy-Man for the kind donation of panels make/test that this is possible: + https://github.com/Galaxy-Man + +*****************************************************************************/
\ No newline at end of file |