
diff options
| author | mrcodetastic <12006953+mrcodetastic@users.noreply.github.com> | 2024-07-28 22:00:45 +0100 |
|---|---|---|
| committer | mrcodetastic <12006953+mrcodetastic@users.noreply.github.com> | 2024-07-28 22:00:45 +0100 |
| commit | f2634319ab7ebfe22fc6d2ebabcdd27879f3667e (patch) | |
| tree | d8834f64f0dc4349bf34cf29a6831a12063b1435 /examples/VirtualMatrixPanel/README.md | |
| parent | aa28e2a93baaf90083b2d556c0ac80602d9940aa (diff) | |
Clean-up and fix some examples
Diffstat (limited to 'examples/VirtualMatrixPanel/README.md')
| -rw-r--r-- | examples/VirtualMatrixPanel/README.md | 51 |
1 files changed, 51 insertions, 0 deletions
diff --git a/examples/VirtualMatrixPanel/README.md b/examples/VirtualMatrixPanel/README.md new file mode 100644 index 0000000..c5aca88 --- /dev/null +++ b/examples/VirtualMatrixPanel/README.md @@ -0,0 +1,51 @@ +## Chained Panels example - Chaining individual LED matrix panels to make a larger panel ## + +This is the PatternPlasma Demo adopted for use with multiple LED Matrix Panel displays arranged in a non standard order (i.e. a grid) to make a bigger display. + + + +### What do we mean by 'non standard order'? ### + +When you link / chain multiple panels together, the ESP32-HUB75-MatrixPanel-I2S-DMA library treats as one wide horizontal panel. This would be a 'standard' (default) order. + +Non-standard order is essentially the creation of a non-horizontal-only display that you can draw to in the same way you would any other display, with VirtualDisplay library looking after the pixel mapping to the physical chained panels. + +For example: You bought four (4) 64x32px panels, and wanted to use them to create a 128x64pixel display. You would use the VirtualMatrixPanel class. + +[Refer to this document](https://github.com/mrfaptastic/ESP32-HUB75-MatrixPanel-DMA/blob/master/doc/VirtualMatrixPanel.pdf) for an explanation and refer to this example on how to use. + + +### Steps to Use ### + +1. [Refer to this document](https://github.com/mrfaptastic/ESP32-HUB75-MatrixPanel-DMA/blob/master/doc/VirtualMatrixPanel.pdf) for an explanation and refer to this example on how to use. + +2. In your Arduino sketch, configure these defines accordingly: +``` +#define PANEL_RES_X 64 // Number of pixels wide of each INDIVIDUAL panel module. +#define PANEL_RES_Y 32 // Number of pixels tall of each INDIVIDUAL panel module. + +#define NUM_ROWS 2 // Number of rows of chained INDIVIDUAL PANELS +#define NUM_COLS 2 // Number of INDIVIDUAL PANELS per ROW + +#define PANEL_CHAIN NUM_ROWS*NUM_COLS // total number of panels chained one to another + +#define VIRTUAL_MATRIX_CHAIN_TYPE <INSERT CHAINING TYPE HERE - Refer to documentation or example> + +``` +VIRTUAL_MATRIX_CHAIN_TYPE's: +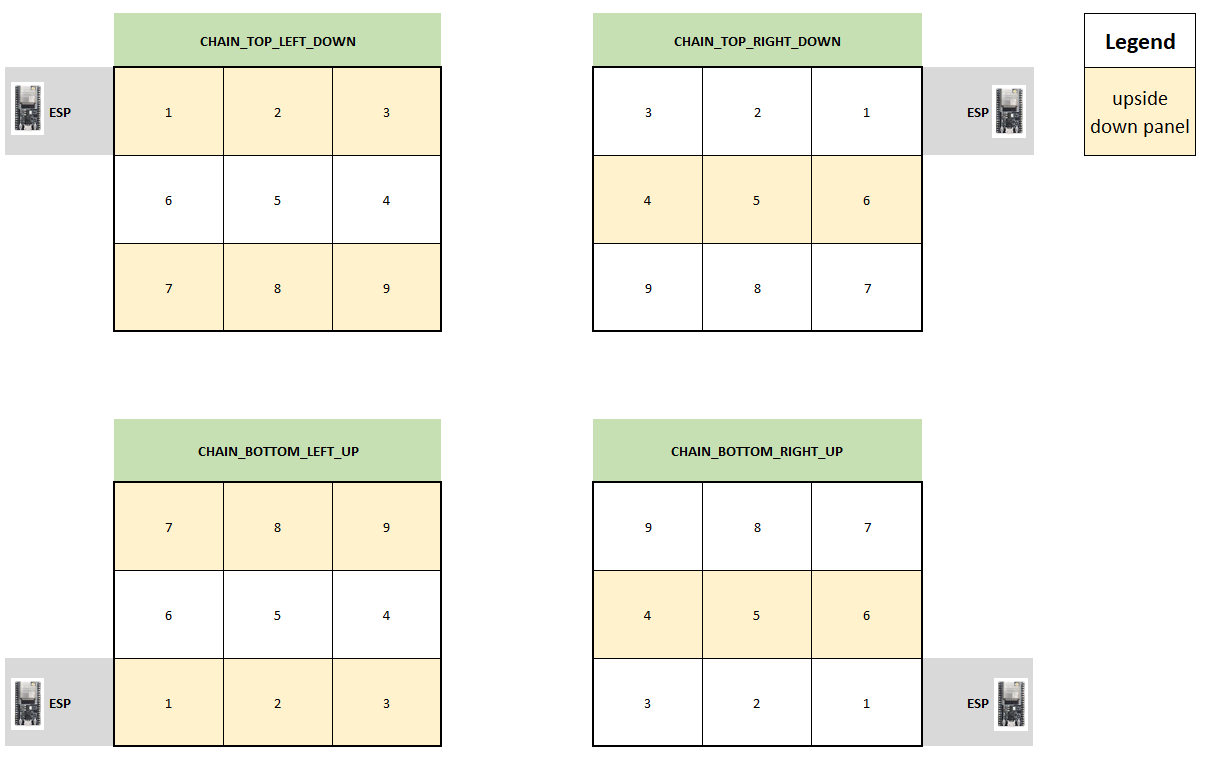 + + +3. In your Arduino sketch, use the 'VirtualMatrixPanel' class instance (virtualDisp) to draw to the display (i.e. drawPixel), instead of the underling MatrixPanel_I2S_DMA class instance (dma_display). + + +#### Thanks to #### +* Brian Lough for the Virtual to Real pixel co-ordinate code. + +YouTube: https://www.youtube.com/brianlough + +Tindie: https://www.tindie.com/stores/brianlough/ + +Twitter: https://twitter.com/witnessmenow + +* Galaxy-Man for the donation of hardware for testing. |